Some of you may not know that I host a Crafternoon once a month, and each Crafternoon session tends to focus on a particular theme. For my July Crafternoon, I had to do a Christmas in July theme, specially that Stampin Up has introduced the 'Carols of Christmas' Bundle as a special promotion in in the month of July. I was among the first ones to place an order for this Bundle and I have been playing with it ever since I received my order. Participants in my July Crafternoon absolutely loved it also. They loved the samples I made, which showcased a number of different ways you can create with these product. Today I will show you only a few of the samples I made, will keep some for later as I went a little overboard with making quite a few projects. If I was to show you all of the samples today, it will be at least a 10 page long post, and I don't think you all have time to sit through such a long post.
Here are the make and take samples I made for my Christmas in July Crafternoon. With couple of them, I got my inspiration from the samples SU provided along with this promotion. Of course, I changed a few things to give it my personal touch.
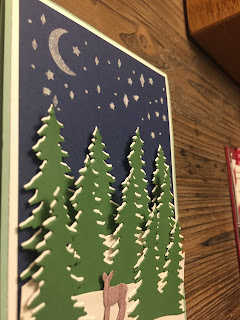
This one is a favourite of mine, but it is a labour of love. There are 12 Christmas trees in total on this one card. 6 green and 6 white ones, the green is slightly offset from the white to achieve the look of snow on the trees. The night sky is done with embossing paste. I made a template using a window sheet and scrapped over it with embossing paste. Not sure if you can make it out, but I also added some dazzling diamond to the embossing paste to give it extra shine.
From the most complicated to the least complicated creation. This is a very simple and yet very effective card. Here I used the framelit in the bundle to create frame around the vellum paper. The greeting is embossed on the vellum using black embossing powder. Underneath the vellum is a piece of 'Be Merry' designer series paper, completed with a bow made with the Double-stitched ribbon. On this card, the focal point is the frame around the vellum. Instead of the designer paper, you can use a photo, you can create your own designer paper, what ever you wish.
This was my first design with this set, and I must say, it is one of my best. I knew that I wanted to use the burlap background stamp set, so I started with that and built it up slowly. I created two different designs, one with a craft base and one with the vanilla base. I like them both, but I am leaning more towards the vanilla, just because you can make out the burlap background more clearly on the vanilla. But I do also love the white against the craft colour.
I cased this card from the SU samples, although, they used gold and I used silver foil paper and silver embossing powder for the hanging baubles. The most time consuming bit about this card is the embossing, here I have embossed the greeting as well as the hanging baubles. To save time, you can easily create this card stamping with ink. It will still look awesome.
|


No comments:
Post a Comment