Monday 29 May 2017

Crazy Crafter's Blog - Annual Catalogue Sneak Peek


For today's project I have decided to showcase the 'Colourful Seasons' suite of products. This is one of my favourite sets in the new catalogue, I just love cherry blossoms. It reminds me of spring, sign of new life, a new beginning. It's also special because I was born in spring. Although winter is almost upon us here in Australia, my mind went to spring. So here is what I have come up with.


For the card front I have used the 'Colour Theory Designer Series paper'. For the card stock, I have used powder pink and whisper white as the card base. For the chair I used on of the paper from the 'Wood Texture' DSP, and to make look a bit more distressed, I have simply stamped on the smaller cherry blossoms in powder pink. 


The greeting was embossed in white embossing powder. Completed with powder pink ribbon.


Thank you for visiting my blog today, hope you have enjoyed browsing through my projects and found some inspirations. If you like what you see, please leave a comment or two below, or simply click on one of the reaction buttons to let me know what your thoughts are about my creations. I value your opinion and I am always looking to improve my craft through constructive feedback from my guests/readers. I am also looking to expand my audience base, so please feel free to share my creations within your social circle.

Sunday 21 May 2017

Crazy Crafters Blog Hop with Nadine Koller


I have chosen to recreate Nadine' s Birthday Ballon project which she made with window box framelit and the matching card to go with the window box.


What stood out for me in Nadine's creation is the colour combo, and the idea of a matching card and a gift box. So that is what I have decided to take away from this example and recreate a version of my own. Here I have decided to use the new In Colours 2017-2018 Lemon Lime Twist and a touch of Berry Burst. 


I have used the flourishing thinlit dies, and used the both the negative and positive cut out together. This bit is a little tricky as it requires for a delicate touch. As I didn't want the cut out bits come away completely from the paper, I had to be very careful when transporting it from the Big Shot to the card front, keeping all the pieces intact. 


Finishing the card with a touch a of Berry Burst under the tag is just what it needed to give the card a bit more diversity and depth. 
Making the window box was a lot less complicated using the window box thinlit dies, its pretty easy to put together. I used the left over flourishing die cuts to decorate the box. 


Again added a touch of pink (Berry Burst) on top of the window box to tie it in with the card. Who knew that just a tiny bit of pink would make such a huge difference. Less is definitely more with this project.


What I really love about this project is that it's a clean and a simple card and gift box. There aren't many bells and whistles with this card, its doesn't need any. The white flourishing die cuts on the vibrant lemon lime twist is just perfect.

Thank you so much for joining us today. I'm Irene Rahman and to keep hopping around, please refer the list below to see who is up next. 


Friday 19 May 2017

Celebrate


No automatic alt text available.


Welcome to our first Ink it! Stamp it! Blog Hop! This month we will be sharing projects inspired by our Celebrate theme. The full line up below will guide through all the projects and we'd love to hear from you on what your favourite type of celebration is.

I have chosen to showcase 'Birthday Celebration' as my theme for this inaugural  'ink it, stamp it, blog hop. I've decided to do something special for today's project, a combo, 2 in 1, a Z fold and a box card. to help this vision come to life, I used a new product that cries out birthday to me, which is called the "Birthday Delivery" suite of products from the new annual catalogue.


Believe it or not, there hardly any stamping required for this project, I only actually just stamped the two greetings. The rest involves a lot of fussy cutting as I didn't actually purchase the coordinating framelits, that would have made this project a lot easier to make. As it is I had to do it the hard way and actually cut out each of these images individually from the "Birthday Memories Designer Series Paper".


For measurement for the Z fold card, I turned my good friend 'you tube' for a crash course on how to make a Z fold card. Here is a link to a tutorial I watched for inspiration.


Once the Z card was complete, I then placed two strips of whisper white card stock in the middle section of the Z fold, creating two additional panels to stick some more balloons, presents and couple of more birthday animals to give the card more depth and density.


Once the box panels were in place, I then went to town with all the decorations. I intentionally made it look very busy, it feels more like a party to me.
Finally, I made a belly band to hold it all together nicely. When its folded down, its quite a thick card, it just needed a something to keep it all in place. 


Thank you so much for joining us today. We hope you'll join us again next month to see our NEW 2017-2018 Catalogue projects. I'm Irene Rahman and to keep hopping around, please refer to the list below to see who is up next.

Whitewashing on Kraft


I am trying out a new technique for this project, I believe it's known as "Whitewashing". I saw some cards on Pinterest made with this technique and I became curious. So I naturally turned to youtube and found a few very helpful tutorials on how to use this technique. Here is a link for one of the youtube tutorial I found to be very useful.


Here I have used this technique with the 'fabulous flamingo'. I love how both of these cards turned out.


Same technique using the 'Oh So Eclectic' Set.


Thank you for visiting my blog today, hope you have enjoyed browsing through my projects and found some inspirations. If you like what you see, please leave a comment or two below, or simply click on one of the reaction buttons to let me know what your thoughts are about my creations. I value your opinion and I am always looking to improve my craft through constructive feedback from my guests/readers. I am also looking to expand my audience base, so please feel free to share my creations within your social circle.

Wednesday 17 May 2017

Memory Bugs


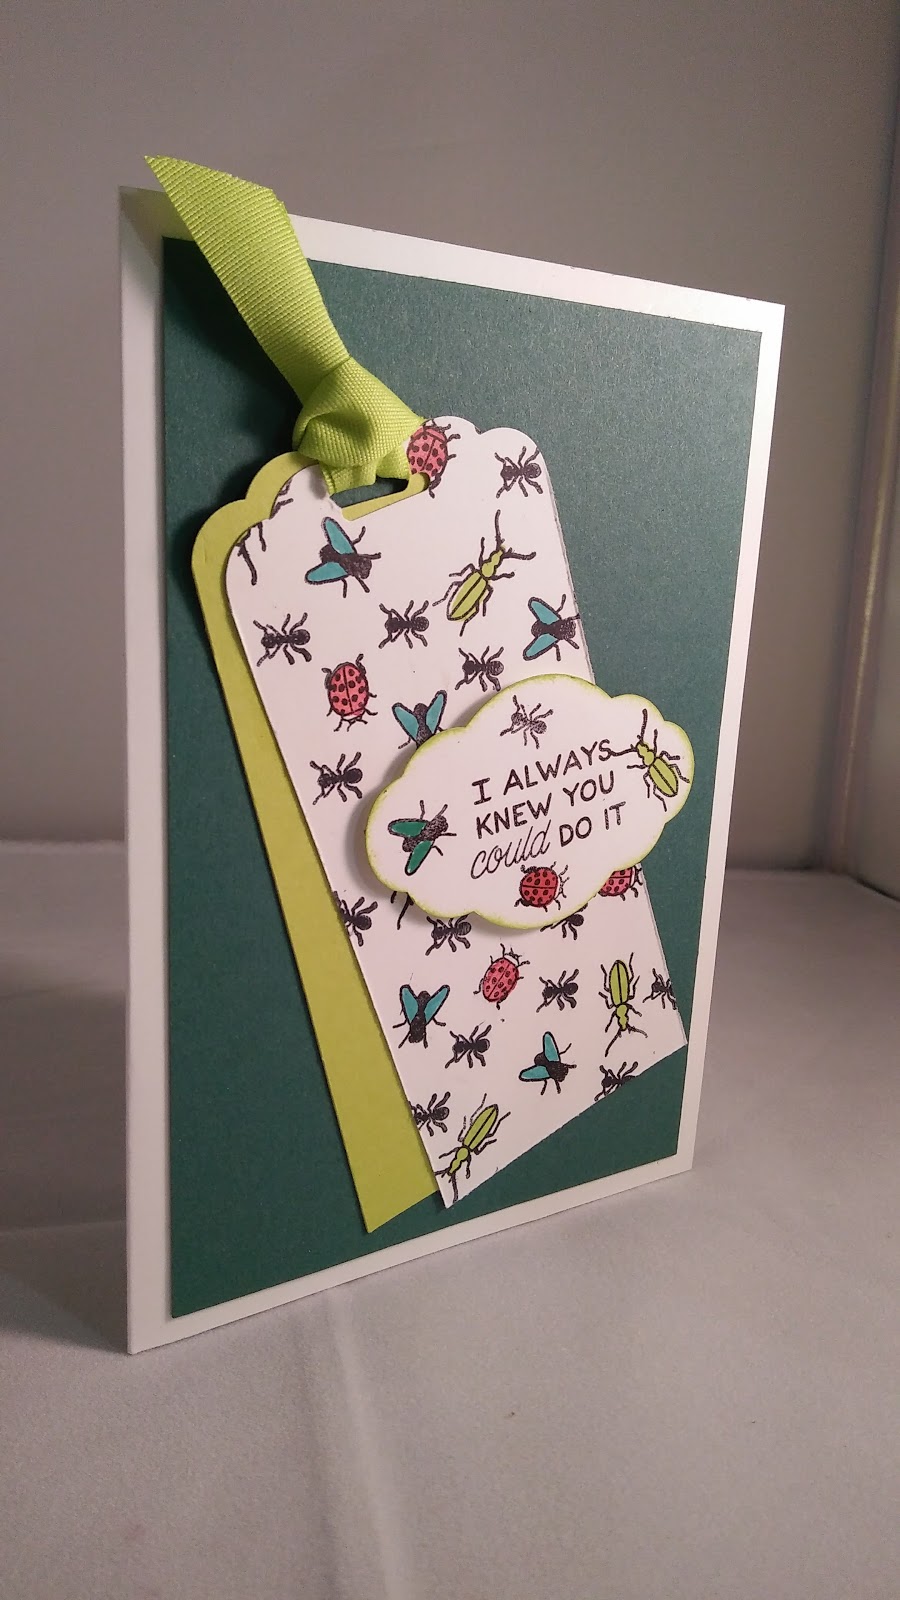
For this project I have decided to use the 'the Beatles and Bugs' stamp set. This set was a must buy for me as I have three boys. My eyes lit up as soon as I saw this set, my mind was full of ideas of all the boyish cards I could make with this. However, I have to confess that this is my first time using it. But its not due to lack of interest, I have just been really busy playing with so many other great sets. It's better late than never I suppose. 


I went with a really simple card design, as I spent a bit of time in stamping each Beatles and bugs individually. That's probably the most complicated bit about this card as these little critters can take a bit of effort to get them looking just right. As this was my first time using this set, there was bit of a trial and error process. 


I also made a little gift to go with the card, a miniature memory game that fits inside a match box. I acctually didn't make the match box myself, I know what you're thinking, That's definitely not like me to buy something that I can easily make. But I had purchased about 50 of these match boxes to use for my swaps for the last Onstage Local event, but unfortunately it didn't get delivered in time. So now I have to make use of them somehow, so if anyone wants a few of these boxes, please let me know. I am happy to part with some of them.


Using the left over of the stamped paper, I made a belly band around the match box. 


 It wasn't long before my little one got his hands on the memory game. He was very excited to have his own miniature game,  made by his Mama. Apparently, I am the best mummy in the whole wide world, so worth the effort. An added bonus was him actually wanting to learn more about these critters, so we ended up on Google, trying to find out their names. It turned out to be quite an educational exercise, although it wasn't the intended purpose. 

Thank you for visiting my blog today, hope you have enjoyed browsing through my projects and found some inspirations. If you like what you see, please leave a comment or two below, or simply click on one of the reaction buttons to let me know what your thoughts are about my creations. I value your opinion and I am always looking to improve my craft through constructive feedback from my guests/readers. I am also looking to expand my audience base, so please feel free to share my creations within your social circle.

Tuesday 16 May 2017

Eclectic Thanks

I have decided to give the daisies a break for a little while and go back to my other favourite stamp set "Oh So Eclectic". This is my first time trying the smooshing technique. I didn't have water colour paper so I used shimmery white card stock paper, which is not as good as the watercolour paper when it comes to smooshing. But this is a second best choice if you don't have watercolour paper. 
If you don't yet know how to watercolour with smooshing technique, here is you tube link that I found helpful. 
Once my background was done, all I then had to do is stamp the eclectic flowers with white heat embossing powder, coloured them in and cut them out. I cut them out the old school way, can you believe it, I actually used scissors. For the colours, I used the new In Colours - Baby Powder and Tranquil Tide. Yes, you're right if you're thinking that I have used this colour combo before. That's true, I have used this combo a few times already, I just love it.


Thank you for visiting my blog today, hope you have enjoyed browsing through my projects and found some inspirations.
If you like what you see, please leave a comment or two below, or simply click on one of the reaction buttons to let me know what your thoughts are about my creations. I value your opinion and I am always looking to improve my craft through constructive feedback from my guests/readers.
I am always looking to expand my audience so please feel free to share my creations with your social circle.

Monday 15 May 2017

Hello Daisy


As promised, here are some more creations with the 'Delightful Daisies' set from new annual catalogue. Here I have stamped two different daisies, each on a single stem. At first I wanted to stamp a bunch of daisies with the smaller daisy image, but I stopped at one. I think it looks simple but very elegant as a stand alone flower, particularly as the background is quite busy. Speaking of the background, I love this new designer series paper, its called 'Fresh Floral'. They are available in all of the 2017-2018 In Colours, here I have used the 'Tranquil Tide' colour DSP and card stock. 


For the daisies, I have used 'Powder Pink' which is another one of the new In Colours. I love this colour combination, you're definitely going to see more of this colour combo from me. 


Here I have stamped the larger daisy image first and then placed the punched out one on top, giving it more depth. 


Thank you for visiting my blog today, hope you have enjoyed browsing through my projects and found some inspirations. If you like what you see, please leave a comment or two below, or simply click on one of the reaction buttons to let me know what your thoughts are about my creations. I value your opinion and I am always looking to improve my craft through constructive feedback from my guests/readers. I am also looking to expand my audience base, so please feel free to share my creations within your social circle.