Friday, 24 November 2017

Ink it! Stamp it! Blog Hop: HOLIDAY CATTY


Welcome to the Ink it! Stamp it! Blog Hop. This month we will be sharing projects inspired by our Holiday Catty, which is filled with awesome new product. The full line up below will guide through all the projects and we'd love to hear from you on what your favourite Holiday Catalogue products are and would love to see some of the projects you have created for Christmas this year.

I have decided to use the Hearts of Home stamp set and the Hometown Greetings edgelits dies for my project today. It is what I call an epic card, in the sense that it took me almost two hours to complete just one card. what should have been a simple card with layers of dies stuck on top of each other. But it certainly did not seem that way to me. 


There are a number of reason why this was an epic card:

  • I coloured in the houses, trees and the snow man
  • I decided to add lights in the windows which meant that i had to make a template of each houses and cut out a second house in yellow card stock and stick it in the back of each house 
  • Of course i had to add some snow, using the embossing paste, I added chunks of snow on the ground, on rooftops and on the trees,


Despite how long it took me to make this card, I quite like how it turned out. It was so worth the time and effort put into this project. I hope you also like what I have created.


Thank you so much for joining us today. We hope you'll join us again next month to see our (next theme) projects. I'm (your name) and to keep hopping around see the list below to see who is up next.


Tuesday, 5 September 2017

Eid-ul-Adha 2017


Eid-ul-Adha is the second celebration in the Islamic calendar, approximately about two months and ten days after Ramadan Eid, which is known as Eid-ul-Fitr. Eid-ul-Adha is known to be the greater of the two, it is also known as the feast of Sacrifice.
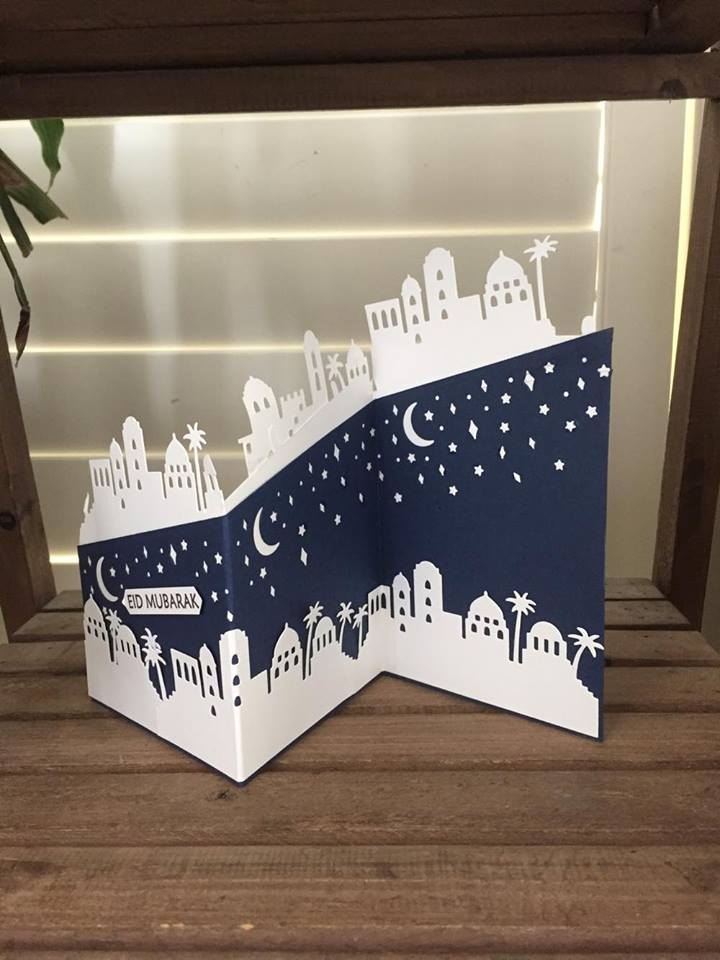
My family and I along with the Muslim communities in Australia, celebrated Eid-ul-Adha last weekend. In preparation for the day, I started to make my Eid cards couple of weeks ago. Some of you may recall my post about Eid cards I made for Ramadan Eid with the Eastern Beauty suite of products. This time I have used the 'Night In Bethlehem' bundle  together with 'Eastern Palace Designer Series Paper'. Night In Bethlehem bundle is from the new Holiday catalogue


I am mindful that this backdrop of Bethlehem was probably never intended to be used as a scene for Eid celebrations. But given that both religion shares the same origin, I think this works well for Eid cards as well as Christmas cards. For example, if i had used the images of the Shepherd and the Crib and the large Star on the same design, it would more like a Christmas card. But without those images, its just a Middle-Eastern town, which is perfect for a Eid Card. I have used the Night Sky from 'Card Front Builder Thinlit Dies' to create the silhouette of a night sky in the Mediterranean.  


I attended a craft class by my good friend Carolina Evans, where we did fun fold cards, and ever since then, I have been playing around with various fun fold techniques. I have done an 'Z' fold card before but not one that cascades down like this own. I just love how it turned out, especially considering I had no idea what I was doing. I just kept building it up as I went , until it became so thick that I could hardly close it. Then I said to myself 'maybe I should stop'.


In the inside, I carried on with the same backdrop, and more of the same night sky.


For the second and the third Eid cards, I used the 'Bridge Fold' technique. There are plenty of recipes on this technique on Pinterest, if you're interested to know how to make one. Its a 3D card, allowing to create a background and a foreground. Here I have used the sames images as the background and foreground,  increasing the density of the buildings. But they work just as well when they are different.


I have used paper from the Eastern Palace suite of products, giving it more of a middle-eastern vibe. 


Thank you for visiting my blog today, hope you have enjoyed browsing through my projects and found some inspirations. If you like what you see, please leave a comment or two below, or simply click on one of the reaction buttons to let me know what your thoughts are about my creations. I value your opinion and I am always looking to improve my craft through constructive feedback from my guests/readers. I am also looking to expand my audience base, so please feel free to share my creations within your social circle.

Sunday, 20 August 2017

QUICK & EASY


I titled these two projects quick and easy, precisely because they are quick and easy projects to make. These cards perfect for those moments when you son is about to go to a birthday party and you realise that you haven't yet made a card. This is literally what happened to me and I was able to create these cards in just under 20 minutes. 


The star for me in both of these designes are the paper. This is called 'Pick A Pattern' designer series paper. Its perfect for cards for younger people. I love the splash of colours on neutrals. There is not a lot of elements to this card that I can talk about, except for maybe the 'Happy Birthday' thinlit die. Its absolutely one of my favourite product in this catalogue, as it get used quite a lot. I also used the multipurpose adhesive paper at the back of the piece of paper I cut out the happy birthday from, this makes sticking the thinlit to the card front so much easier, completely mess free.


Thank you for visiting my blog today, hope you have enjoyed browsing through my projects and found some inspirations. If you like what you see, please leave a comment or two below, or simply click on one of the reaction buttons to let me know what your thoughts are about my creations. I value your opinion and I am always looking to improve my craft through constructive feedback from my guests/readers. I am also looking to expand my audience base, so please feel free to share my creations within your social circle.